In this article we’ll show how to set-up pgAdmin running with Docker to access a PostgreSQL database also running as a Docker container on the same host.
Table of Contents
Setting up PostgreSQL
First, we will need a PostgreSQL database running with Docker. If you don’t already have this, follow along our guide on running PostgreSQL with Docker and local data persistent storage.
Running pgAdmin with Docker
As the next step let’s connect using pgAdmin. This famous tool is available for many platforms and also as a Docker container image. In this guide we’ll use the container image as it is easy to set-up and portable for any other OS.
First we’ll pull the pgAdmin image from Docker Hub.
$ docker pull dpage/pgadmin4Next we start a container running pgAdmin with the following command.
$ docker run -d \
    --name pgadmin4 \
    -p 5050:80 \
    -e PGADMIN_DEFAULT_EMAIL=user@domain.com \
    -e PGADMIN_DEFAULT_PASSWORD=Test123$ \
    dpage/pgadmin4
This starts pgAdmin in a new Docker container with the given credentials and makes it accessible via localhost:5050 by binding the containers port 80 to it.
Determining the PostgreSQL database IP for connecting
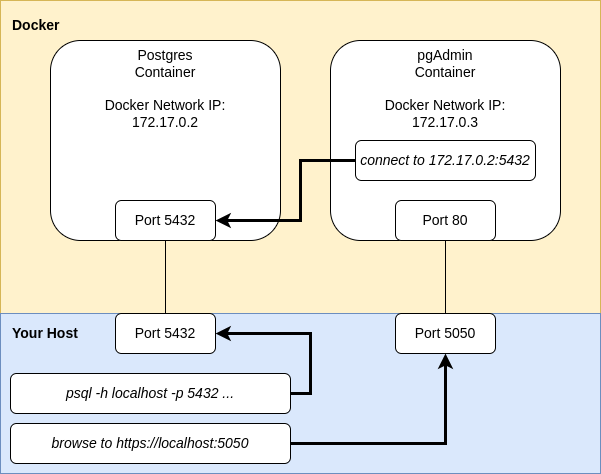
Before we navigate to pgAdmin in our browser, we’ll need to get the Docker’s network IP of our running PostgreSQL container. Connecting with pgAdmin to “localhost:5432” would definitively not work in our scenario as localhost in pgAdmin refers to the containers IP pgAdmin ist running on. See the following diagram for a high-level overview – the Docker IP’s may vary on your system.

To get the proper Docker network IP for our Postgres container, we’ll use docker inspect on the container ID.
$ docker ps | grep postgres
b020097a3a6f   postgres:16.2         "docker-entrypoint.s…"   2 days ago      Up 9 seconds    0.0.0.0:5432->5432/tcp, :::5432->5432/tcp   mypostgres
$ docker inspect --format='{{range .NetworkSettings.Networks}}{{.IPAddress}}{{end}}' b020097a3a6f
172.17.0.2
In this case the IP of the Postgres container is 172.17.0.2. Having this, we can continue connecting our dockerized pgAdmin with PostgreSQL…
Connecting to the database
Now that we have the correct IP of our dockerized PostgreSQL database, let’s navigate to localhost:5050 in the browser to connect with pgAdmin.

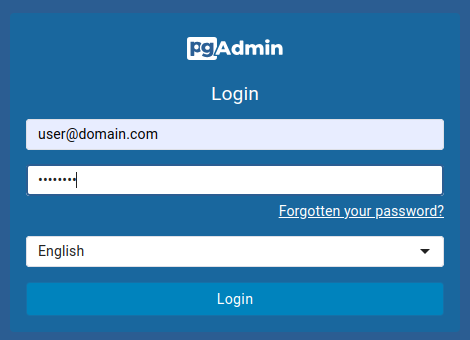
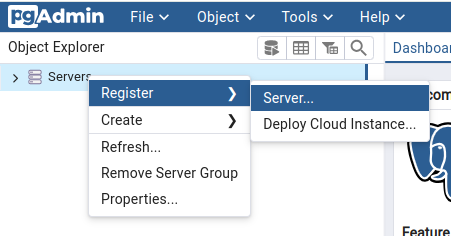
In the login screen, just enter the values that PGADMIN_DEFAULT_EMAIL and PGADMIN_DEFAULT_PASSWORD were set to when starting the pgAdmin container. Next, register a new server…

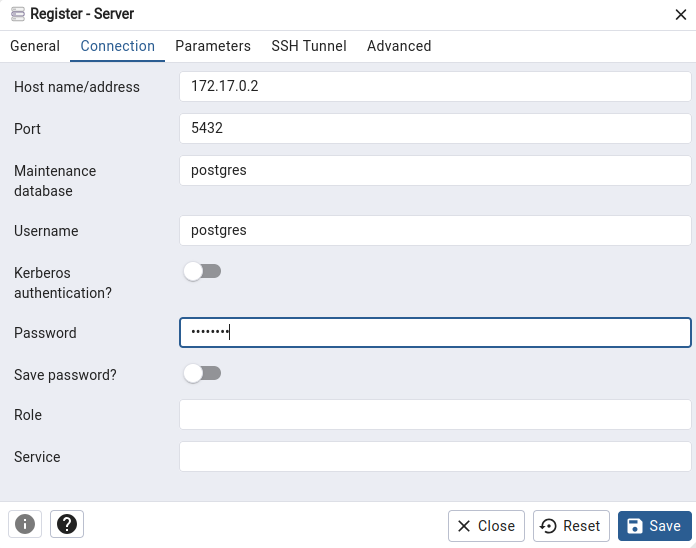
Give the new server a name in the first tab and enter the connection details in the second tab.

For the servers address we use the IP figured out before using docker inspect. Default database and username are postgres, the password is the value passed as variable POSTGRES_PASSWORD when the Postgres container was started.
After saving, you should be able connect to the Postgres database.

Awesome! You’re now ready to administer the database using pgAdmin.
