A really quick 3-step demonstration on how to use AWS Secrets Manager to pass sensitive data as environment variables to containers running in the managed Elastic Container Service (ECS).
In this article it is assumed that you have a basic knowledge on how to create AWS ECS services on an existing cluster. We will use the secure-config-test project with a freely available image on Docker Hub to set-up an ECS service. This small app starts up a simple http server returning a secret configuration item managed by the secure-config Node.js library. To run properly, the secret config decryption key needs to be passed as an environment variable named CONFIG_ENCRYPTION_KEY to the container. We’ll use AWS Secrets Manager to handle this key in a secure way instead of passing it as a plain text variable in the ECS service definition.
Table of Contents
Create a secret in Secrets Manager
First, let’s create a managed secret in AWS Secrets Manager. In the AWS console, head over to Secrets Manager. Click on Store a new secret in the upper right corner and create a secret with the following parameters:
After the creation of the secret is complete, it should look like this. You can already copy the ARN for the next step.

Add permissions to the ECS execution role in IAM
Once the secret is created, we’ll need to enable Elastic Container Service to access it. To do so, the IAM role that is used to run the ECS service task must have sufficient permissions. To enable the role, ecsTaskExecutionRole in our case, edit it in IAM and add a custom inline policy allowing the secretsmanager:GetSecretValue action on the created secret.
The inline policy needed to access the secret is the following – replace the secrets ARN with yours.
{
  "Version": "2012-10-17",
  "Statement": [
    {
      "Effect": "Allow",
      "Action": [
        "secretsmanager:GetSecretValue"
      ],
      "Resource": [
        "arn:aws:secretsmanager:eu-central-1:xxxx:secret:secureConfig/encryptionKey-Zc6y5k"
      ]
    }
  ]
}
Note: You could also add a policy allowing the ECS execution role to read any secret out of Secrets Manager but as a best practice you should narrow the privileges down to the needed secrets by specifying their ARN’s in the policy.
Giving the inline policy a descriptive name like Read-SecretsManager-secrets, the final role permissions should look like that.

Using the secret in the ECS task definition
Next, head over to ECS in the AWS console and create a task definition as you are used to. The basic parameters are:
To pass a secret as an environment variable, add a secrets property to the task definition as a sibling to the desired containerDefinitions array element. There, add an array element with name CONFIG_ENCRYPTION_KEY as it is expected by the container image. For valueFrom provide the secrets ARN followed by a “:” and the name of the key to be retrieved out of the secret plus a trailing “::”. This will extract exactly this one specific key of the stored secret.

At the time of writing this article, adding secrets was only possible by editing the task definition JSON directly. The final JSON should look like this.
{
  "taskDefinitionArn": "arn:aws:ecs:eu-central-1:xxxx:task-definition/secure-config-test:4",
  "containerDefinitions": [
    {
      "name": "secure-config",
      "image": "tsmx/secure-config-test",
      "cpu": 0,
      "portMappings": [
        {
          "name": "secure-config-3000-tcp",
          "containerPort": 3000,
          "hostPort": 3000,
          "protocol": "tcp",
          "appProtocol": "http"
        }
      ],
      "essential": true,
      "environment": [],
      "mountPoints": [],
      "volumesFrom": [],
      "secrets": [
        {
          "name": "CONFIG_ENCRYPTION_KEY",
          "valueFrom": "arn:aws:secretsmanager:eu-central-1:xxxx:secret:secureConfig/encryptionKey-Zc6y5k:CONFIG_ENCRYPTION_KEY::"
        }
      ],
      "logConfiguration": {
        "logDriver": "awslogs",
        "options": {
          "awslogs-group": "/ecs/secure-config-test",
          "awslogs-create-group": "true",
          "awslogs-region": "eu-central-1",
          "awslogs-stream-prefix": "ecs"
        }
      },
      "systemControls": []
    }
  ],
  "family": "secure-config-test",
  "executionRoleArn": "arn:aws:iam::xxxx:role/ecsTaskExecutionRole",
  "networkMode": "awsvpc",
  "revision": 4,
  "volumes": [],
  "status": "ACTIVE",
  "requiresAttributes": [
    {
      "name": "com.amazonaws.ecs.capability.logging-driver.awslogs"
    },
    {
      "name": "ecs.capability.execution-role-awslogs"
    },
    {
      "name": "com.amazonaws.ecs.capability.docker-remote-api.1.19"
    },
    {
      "name": "ecs.capability.secrets.asm.environment-variables"
    },
    {
      "name": "com.amazonaws.ecs.capability.docker-remote-api.1.18"
    },
    {
      "name": "ecs.capability.task-eni"
    },
    {
      "name": "com.amazonaws.ecs.capability.docker-remote-api.1.29"
    }
  ],
  "placementConstraints": [],
  "compatibilities": [
    "EC2",
    "FARGATE"
  ],
  "requiresCompatibilities": [
    "FARGATE"
  ],
  "cpu": "1024",
  "memory": "3072",
  "runtimePlatform": {
    "cpuArchitecture": "X86_64",
    "operatingSystemFamily": "LINUX"
  },
  "registeredAt": "2024-12-08T20:35:48.186Z",
  "registeredBy": "arn:aws:iam::xxxx:user/admin",
  "tags": []
}
Deploy the ECS service and test
After the task definition is done, deploy a service for it by clicking Deploy --> Create service in the task. Make sure it is deployed with public access for testing purposes…
After a few minutes the new service should be ready and you can go to your ECS Cluster --> services --> your service --> tasks --> running task --> network bindings to find out the External link (should be a public IP on port 3000).
Opening this link you should see the following in your browser…
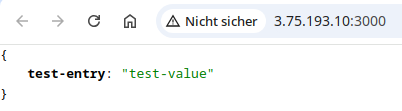
Congratulations! This indicates the secret encryption key has been successfully injected to the ECS service as an environment variable by using AWS Secrets Manager.