Simple guide to set-up enterprise-ready usage of Bedrock as a LLM provider for OpenCode by facilitating a LiteLLM proxy. Including showcasing EU-only usage of Anthropic Claude models for GDPR compliance.
Many users and companies do have up & running AWS accounts. By using Bedrock, you’ll get access to a whole variety of LLMs without the need of any other account or subscription. Also, Bedrock gives you the chance to let models run in specific regions for GDPR or compliance reasons, e.g. using Anthropic Claude models EU-only.
For OpenCode (OC), there’s already a direct integration with AWS Bedrock which works fine for individual users. However, there are some fundamental drawbacks in enterprise scenarios with a lot of OC users. To name the most important ones:
All of this can be mitigated very easily with LiteLLM as a proxy in between Bedrock and OC. So let’s get into it.
Table of Contents
Prerequisites
In this article we assume that you already have…
*) These requirements are only needed on one machine running the LiteLLM proxy.
If you don’t have the AWS CLI or need to update to obtain the latest Bedrock support, reach out to the installation and update site. This guide was done with version aws-cli/2.34.57.
tl;dr – fast-lane setup
Follow this checklist to get Bedrock up&running with OpenCode in some minutes.
$ python3.11 -m venv ~/.venvs/litellm
$ source ~/.venvs/litellm/bin/activate
$ pip install --upgrade pip
$ pip install "litellm[proxy]"model_list:
- model_name: sonnet-4-6
litellm_params:
model: bedrock/eu.anthropic.claude-sonnet-4-6
aws_region_name: eu-central-1
- model_name: opus-4-6
litellm_params:
model: bedrock/eu.anthropic.claude-opus-4-6-v1
aws_region_name: eu-central-1$ source ~/.venvs/litellm/bin/activate
$ litellm --config ~/.venvs/litellm/config.yaml"provider": {
"litellm": {
"npm": "@ai-sdk/openai-compatible",
"name": "AWS Bedrock (LiteLLM)",
"options": {
"baseURL": "http://localhost:4000"
},
"models": {
"sonnet-4-6": {
"name": "Claude Sonnet 4.6"
},
"opus-4-6": {
"name": "Claude Opus 4.6"
}
}
}
}If you’re interested in the details, read further… Anyways, after the basic setup is done, you should refer to the next steps.
Detailed setup
Grant IAM permissions
In order to use Bedrock via LiteLLM, the logged-in CLI user on the proxy machine must have appropriate permssions. Check which user is currently logged on, it should be an IAM user.
$ aws sts get-caller-identityShould give you something like that.
{
"UserId": "AIDATRWI7************",
"Account": "2441********",
"Arn": "arn:aws:iam::2441********:user/admin"
}For the user (here: admin) head over to the AWS Console under IAM --> User --> Permissions --> Permission policies make sure that AmazonBedrockFullAccess is granted.
If it is not there click on Add permissions --> Attach policies directly and search for it to add.
Note 1: If your user already has AdministratorAccess, this is already enough.
Note 2: Some models also require a special confirmation for accessing them. See the model access guide for details. The easiest way normally is to invoke the model in the console playground once and accept the terms if any.
Installing LiteLLM
Installing LiteLLM as the LLM-proxy is simply done via Pythons package manager pip. I suggest to install in a virtual environment for clean package separation. In this guide we’ll use ~/.venvs/litellm as the environment folder but you can take any other as well.
To create the virtual environment and install LiteLLM execute the following commands.
$ python3.11 -m venv ~/.venvs/litellm
$ source ~/.venvs/litellm/bin/activate
$ pip install --upgrade pip
$ pip install "litellm[proxy]"Note: My most current Python3 version was 3.14 which was too new for LiteLLM and its dependencies so I explicitly used a slightly older 3.11.
Configuring AWS Bedrock in LiteLLM
In order to function as a LLM proxy for AWS Bedrock we need to configure the desired Bedrock endpoints within LiteLLM. In this guide we’ll configure Claude Sonnet 4.6 and Claude Opus 4.6 with EU-only usage for GDPR compliance. First, let’s check out the names of those by running the following command.
$ aws bedrock list-inference-profiles \
--region eu-central-1 \
--query "inferenceProfileSummaries[?contains(inferenceProfileId, 'claude-opus-4')]" With AWS Bedrock, you typically call inference profile endpoints that act like a gateway for a specific model and route requests to different regions etc. You can omit the --query parameter to get all available endpoints. Also if you prefer another --region then change it.
In the output you chould see a big JSON with objects like this.
{
"inferenceProfileName": "EU Anthropic Claude Opus 4.6",
"description": "Routes requests to Claude Opus 4.6 in eu-north-1, eu-west-3, eu-south-1, eu-south-2, eu-west-1, eu-central-1.",
"createdAt": "2026-02-05T01:30:28.264997+00:00",
"updatedAt": "2026-02-05T01:30:28.264997+00:00",
"inferenceProfileArn": "arn:aws:bedrock:eu-central-1:2441********:inference-profile/eu.anthropic.claude-opus-4-6-v1",
"models": [
{
"modelArn": "arn:aws:bedrock:eu-north-1::foundation-model/anthropic.claude-opus-4-6-v1"
},
{
"modelArn": "arn:aws:bedrock:eu-west-3::foundation-model/anthropic.claude-opus-4-6-v1"
},
{
"modelArn": "arn:aws:bedrock:eu-south-1::foundation-model/anthropic.claude-opus-4-6-v1"
},
{
"modelArn": "arn:aws:bedrock:eu-south-2::foundation-model/anthropic.claude-opus-4-6-v1"
},
{
"modelArn": "arn:aws:bedrock:eu-west-1::foundation-model/anthropic.claude-opus-4-6-v1"
},
{
"modelArn": "arn:aws:bedrock:eu-central-1::foundation-model/anthropic.claude-opus-4-6-v1"
}
],
"inferenceProfileId": "eu.anthropic.claude-opus-4-6-v1",
"status": "ACTIVE",
"type": "SYSTEM_DEFINED"
}Note: The profile defines that requests will be served from eu-north-1 (Sweden), eu-west-3 (France), eu-south-1 (Italy), eu-south-2 (Spain), eu-west-1 (Ireland) or eu-central-1 (Germany). Therefore no data will leave the EU and the setup is GDPR compliant.
What is needed for the LiteLLM configuration ist the inferenceProfileId with a value of eu.anthropic.claude-opus-4-6-v1. Having those ID’s, create a LiteLLM config file, e.g. directly in the virtual environment folder.
$ nano ~/.venvs/litellm/config.yamlmodel_list:
- model_name: sonnet-4-6
litellm_params:
model: bedrock/eu.anthropic.claude-sonnet-4-6
aws_region_name: eu-central-1
- model_name: opus-4-6
litellm_params:
model: bedrock/eu.anthropic.claude-opus-4-6-v1
aws_region_name: eu-central-1Note: The model qualifier is always bedrock/[inferenceProfileId] with the exact ID’s looked up earlier. For some models, especially older ones, you’ll have to use the model’s ID directly as they do not have an inference profile. Those ID’s can be queried with aws bedrock list-foundation-models.
That’s it for LiteLLM. Now start it up and you should see the models are loaded.
$ source ~/.venvs/litellm/bin/activate
$ litellm --config ~/.venvs/litellm/config.yaml
NFO: Started server process [4171]
INFO: Waiting for application startup.
██╗ ██╗████████╗███████╗██╗ ██╗ ███╗ ███╗
██║ ██║╚══██╔══╝██╔════╝██║ ██║ ████╗ ████║
██║ ██║ ██║ █████╗ ██║ ██║ ██╔████╔██║
██║ ██║ ██║ ██╔══╝ ██║ ██║ ██║╚██╔╝██║
███████╗██║ ██║ ███████╗███████╗███████╗██║ ╚═╝ ██║
╚══════╝╚═╝ ╚═╝ ╚══════╝╚══════╝╚══════╝╚═╝ ╚═╝
#------------------------------------------------------------#
# #
# 'It would help me if you could add...' #
# https://github.com/BerriAI/litellm/issues/new #
# #
#------------------------------------------------------------#
Thank you for using LiteLLM! - Krrish & Ishaan
LiteLLM: Proxy initialized with Config, Set models:
sonnet-4-6
opus-4-6
INFO: Application startup complete.
INFO: Uvicorn running on http://0.0.0.0:4000 (Press CTRL+C to quit)
Alternatively ,you can also check via the LiteLLM endpoint for models.
$ curl http://localhost:4000/models
{"data":[
{"id":"sonnet-4-6","object":"model","created":1677610602,"owned_by":"openai"},
{"id":"opus-4-6","object":"model","created":1677610602,"owned_by":"openai"}
],"object":"list"}% Configuring OpenCode to use LiteLLM models
Next, we register our LiteLLM as a model provider in OpenCode. To do so, we’ll edit the global configuration file ~/.config/opencode/opencode.json on the OC users machine and add the following configuration to the the existing Json. If the provider section is already present, add only the litellm config below it.
"provider": {
  "litellm": {
    "npm": "@ai-sdk/openai-compatible",
    "name": "AWS Bedrock (LiteLLM)",
    "options": {
      "baseURL": "http://localhost:4000"
    },
    "models": {
      "sonnet-4-6": {
        "name": "Claude Sonnet 4.6"
      },
      "opus-4-6": {
        "name": "Claude Opus 4.6"
      }
    }
  }
}As the LiteLLM proxy exposes the configured Claude models with an OpenAI-compatible API, the @ai-sdk/openai-compatible package can be used to consume the models in OpenCode. The name AWS Bedrock (LiteLLM) is arbitrary and just to identify the models as LiteLLM when choosing a model in OpenCode.
In our example, the baseURL is localhost:4000 as our LiteLLM proxy is running locally – change that according to your real setup. The name of the models, sonnet-4-6 and opus-4-6 must exaclty match the configured name used in LiteLLM before.
Select Bedrock models in OpenCode
Last step is to (re-)start OpenCode and select the models provided by LiteLLM by typing /models and searching for LiteLLM.
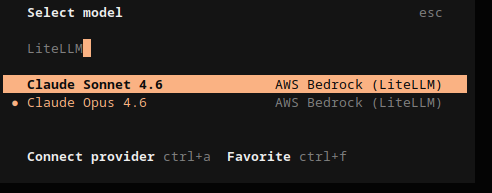
All done. You can now start using Bedrock models in OpenCode.
What’s next?
Having the LiteLLM proxy setup running, the foundation for further improvements in your enterprise envrionment is set. Here are some things you should have a look at next: